Project - Tasks Tab - Screen Description
The Tasks tab allows you to define the work breakdown structure for the project. This is a hierarchical structure of tasks that specify how the work will be completed for the project. When adding a project, the Tasks list is automatically populated with a row representing the project level (Task 1). This task may not be deleted. Task line items are formatted in various ways to provide additional information about the task; for more information see Project Screen Formatting.
Click the Show Levels  button to limit the depth of the project task structure that is displayed. The options are limited to the number of levels defined and the default display is the lowest level.
Click the View  button to display the project task structure in different styles. The choices are: Task View (the default), Details View, Gantt View, and Baseline View.
Additional Task views are available at the bottom of the tab. For more information, see Split Pane.
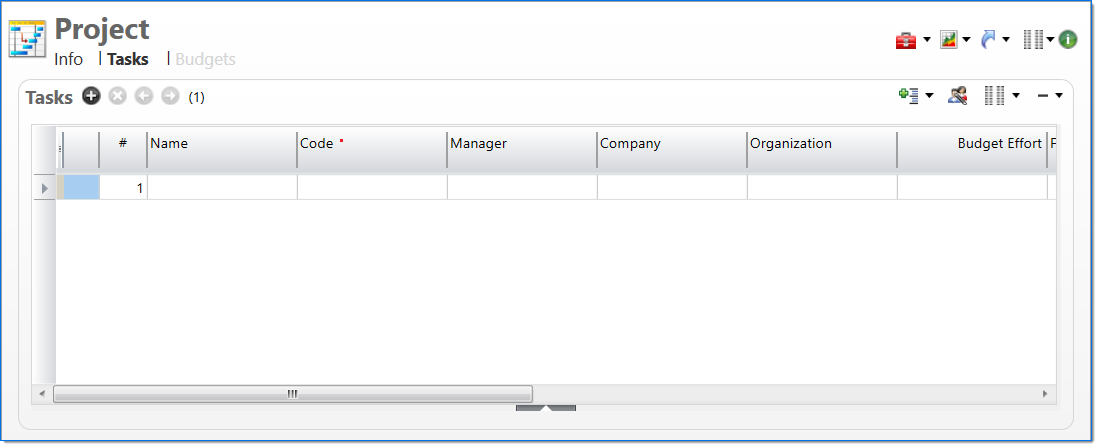
Task View
The Task view allows you to enter, view, and maintain a list of tasks for the project. The default columns are as follows.
| Field | Description | |
|---|---|---|
| Line Number | Displays the sequential number of each task row. | |

|
Name |
Enter a name to describe the task. The name does not have to be unique. For the root task this value is defaulted and kept in sync with the project level. This column has an indicator if the level of the task corresponds with the Variance level. The variance level indicator is a triangle ( |
|
|
Code |
Enter a unique code for the task. This is used to identify the task. Once a code has been entered and submitted, it cannot be changed. For the root task, this value is defaulted and kept in sync with the project level. |
| Manager |
Enter or select the manager assigned to the task. Only active and pending active employees can be selected. For the root task this value is defaulted and kept in sync with the project level. |
|
| Company |
Enter or select a company. Only the project company or active or pending active companies that are in an established intercompany relationship with the project company, and are authorized for the Posting Group can be selected. For the root task this value is defaulted and kept in sync with the project level. |
|
| Organization |
Enter or select an organization. Only active or pending active organizations for the project company can be selected. For the root task this value is defaulted and kept in sync with the project level. |
|
|
Budget Effort |
Displays the sum of task budget effort across organizations and budget categories. |
|
| Fee Type |
Enter or select a fee type. This applies to the current task and all subtasks beneath. Once selected, this cannot be changed. Fee types are used to determine the accounts used for non-chargeable labor postings and the revenue rule used for revenue calculations. If the task is chargeable or has chargeable subtasks, only active chargeable fee types can be selected. If the task is non-chargeable or has non-chargeable subtasks, only active non-chargeable fee types can be selected. If the task has both chargeable and non-chargeable subtasks, no fee types are available. Otherwise, all active fee types can be selected. If the task has an effective fee type and no value has been entered since the value is in effect, the fee type cannot be edited on subtasks. |
|
|
|
Billable | Select if transactions for the task and the task's hierarchy are to be included for billing. If not selected, the task and all tasks below are not included for billing despite their billable property values. This field is read only when non-chargeable. |
| Labor Term | Enter or select an active labor term. This selection is inherited in the lower levels in the branch of the task hierarchy but can be overridden. | |
| Expense Term | Enter or select an active expense term. This selection is inherited in the lower levels in the branch of the task hierarchy but can be overridden. | |
| Work Type |
Enter or select an active work type. This identifies the type of work performed on the task. For the root task this value is defaulted and kept in sync with the project level. |
|
|
|
Status |
Select the status of the task. For the root task this value is defaulted and kept in sync with the project level. |
 ) icon to the left of the name. For more information about the variance level, see Project Controls in
 Additional columns are also available in the Task list. For information on how to present the optional columns, see Manage Columns. To view the available columns, see the ![]() Additional Columns.
Additional Columns.
Details View
The Details view allows you to view and edit detailed information about each project task. This view is designed to ease data entry, providing only enterable fields in a form field layout. The default hierarchical structure of tasks appears in the left pane to allow selection of tasks. The enterable fields appear in the right pane.
Gantt View
The Gantt view allows you to view a list of project tasks and chart their duration on the project calendar. The default hierarchical structure of tasks appears in the left pane to allow selection of tasks. The task duration calendar appears in the right pane as a Gantt chart. For information on the options available in this view, see Gantt View Actions.
![]()
Baseline View
The Baseline view allows you to view a list of project tasks and chart their duration on the project calendar against a selected baseline of the project. The default hierarchical structure of tasks appears in the left pane to allow selection of tasks. The task duration calendar appears in the right pane as a Gantt chart, with a shadow Gantt chart of the baseline. For information on the options available in this view, see Baseline View Actions.

Split Pane
The task split pane allows you to access other project task views. To open the split pane, click the Expand  button at the bottom of the Tasks tab. Use the down-arrow
  at the upper left corner of the split pane to display and select the additional project task views: Authorizations, Budgets, or Resources. For more information, see Task Split Pane.
In the Resource view, you can use the Resource Assistant  button to display the Resource Assistant dialog box. This allows you to add multiple resources across multiple tasks.